NetSuite库存盘点接口探讨及WMS系统对接实例, 思路探讨文章不涉及商业应用或客户信息
有什么用
了解NetSuite库存盘点接口, 以及WMS系统对接实例
学习NetSuite如果通过Restlet进行接口类设计和开发
已提前隐去客户的私人信息, 本文内容不针对任何特定客户, 本文只是思路的探讨, 如有侵权, 请联系作者删除
怎么用
把两个实例代码在NetSuite中创建脚本记录, 配置Integration Record, 让RestLet可以与外界通信
抛砖引玉, 展开思路; 这一类的接口设计(或系统对接, 拓展NetSuite或外部系统功能)都可以引用参考
下面的实现方法已局限于特定的应用(库存盘点), 难免会局限思维, 仅可作为一个特定的实例, 现实当中可以搭配更加灵活的设计, 让整体多系统之间实现协调, 从而达到拓展单一系统功能局限性或包容特定行业应用的特色等目的.
解放人力, 高效协作(系统间, 人与人之间)
相关内容
NetSuite 实现方法
Inventory Count在Script中局限性
本身上的局限
-
Inventory Count 不支持自定义表单(custom form), 但是可以新建自定义表头字段并应用到InventoryCount
-
Inventory Count 不支持显示自定义表头和列表自定义字段
-
Inventory Count 不支持保存自定义列表字段的内容(即便在Script中写入了自定义列表字段内容, 保存单据后, 自定义列表字段内容会清空消失)
- 当在点击“开始盘点Start Count” 动作之前输入货品以及详细的盘点数据, 然后在点击‘开始盘点’, 完成盘点 和审批的流程性动作, 会导致盘点的货品数据只是调增
- 也就是说详细的盘点数据 不是覆盖目前系统中货品的库存数据, 而是新增添加到当前的库存数据中去.
流程上局限
-
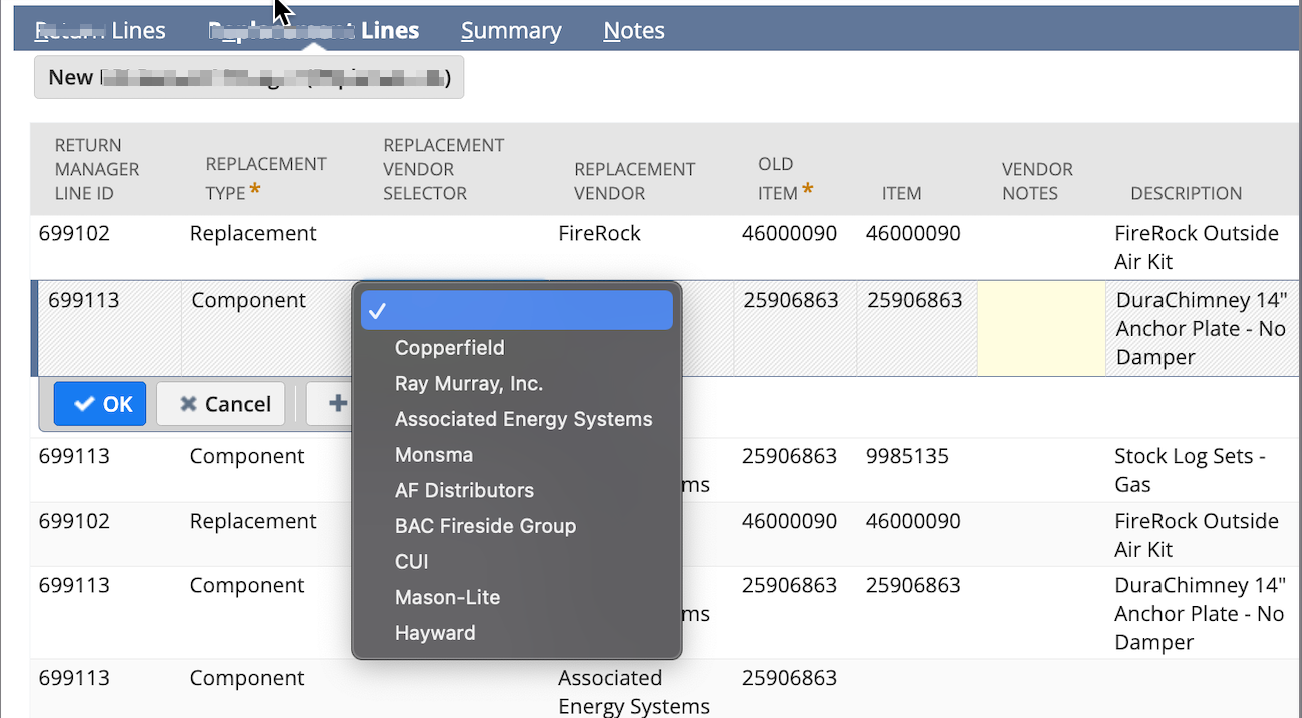
创建库存盘点单. 根据现实情况输入Body上面的字段. 然后搜索或选择货品,然后选择库位和单位后即可保存(此时为‘未结’状态)
-
之后点击“开始盘点” 为‘已开始’状态后点击编辑即可输入 盘点数量, 输入完数量后才能点击盘点 明细按钮打开对话框,然后输入批次号、下拉框状态、数量保存即可,此时状态下拉框 默认只有Good – available 可用状态,输入好判断数量后点击“完成盘点”后就完成了盘点单
-
点击“完成盘点”按钮后状态就变成了 ‘已完成/待审批’状态, 之后就是审批流程。审批通过后就回生成一个库存调整单,就会按照原来的盘点数量来加数量审批通过 后就 会操作数据. 在开发过程中,接收到传过来的值后就可以立即进行一整套操作,跳过审批直接生成库存调整,执行完成后返回信息。
走完库存盘点单Inventory Count 需要搭配 新建保存初始单据 然后 “开始盘点Start Count” 和 “完成盘点Complete Count” 和 “审批Approve”这个四个动作action
问题来了: 我们通过Reslet来接收WMS传来的库存盘单数据, 然后需要一步到位走完NetSuite的库存盘点的四个动作流程才能生效(影响货品库存和GL Impact)
经过测试 “开始盘点Start Count” 和 “完成盘点Complete Count” 和 “审批Approve”这个四个动作是无法用非’N/action’的NetSuite默认包来实现的, 然后Restlet又无法支持引用’N/action’包.
灵活思路解决方案
Restlet先接收和缓存库存盘点的详细Item数据(比如批次和数量等), 然后通过另新建一个User Event Script来继续操作剩下的流程 “开始盘点Start Count”, 输入详细的盘点数量数据 和 “完成盘点Complete Count” 和 “审批Approve”
Sample RestLet Script
解析WMS post传来的参数, 做好数据对应后, 在把详细的盘点数据缓存在表单头的自定义字段中(custbody_wms_invcount_items), 等待下一步处理.
//------------------------------------------------------------------
// Copyright 2018, All rights reserved, Carl Notes.
//
// No part of this file may be copied or used without express, written
// permission of Carl Notes.
//------------------------------------------------------------------

//------------------------------------------------------------------
//Script: ep_OperateInvCount_rl.js
//Developer: Carl
//Date: 20250808
//Description: API REST Endpoint: Operate Inventory Count
//             Running in nonpaged mode, per search upto 4000 results.
//
// ------------------------------------------------------------------

/**
 * @NApiVersion 2.1
 * @NScriptType Restlet
 */
define(['N/error', 'N/record', 'N/runtime', 'N/search'],
    /**
     * @param{error} error
     * @param{record} record
     * @param{runtime} runtime
     * @param{search} search
     */
    (error, record, runtime, search) => {
        /**
         * Defines the function that is executed when a GET request is sent to a RESTlet.
         * @param {Object} requestParams - Parameters from HTTP request URL; parameters passed as an Object (for all supported
         *     content types)
         * @returns {string | Object} HTTP response body; returns a string when request Content-Type is 'text/plain'; returns an
         *     Object when request Content-Type is 'application/json' or 'application/xml'
         * @since 2015.2
         */
        const get = (requestParams) => {

        }

        /**
         * Defines the function that is executed when a PUT request is sent to a RESTlet.
         * @param {string | Object} requestBody - The HTTP request body; request body are passed as a string when request
         *     Content-Type is 'text/plain' or parsed into an Object when request Content-Type is 'application/json' (in which case
         *     the body must be a valid JSON)
         * @returns {string | Object} HTTP response body; returns a string when request Content-Type is 'text/plain'; returns an
         *     Object when request Content-Type is 'application/json' or 'application/xml'
         * @since 2015.2
         */
        const put = (requestBody) => {

        }

        /**
         * Defines the function that is executed when a POST request is sent to a RESTlet.
         * @param {string | Object} requestBody - The HTTP request body; request body is passed as a string when request
         *     Content-Type is 'text/plain' or parsed into an Object when request Content-Type is 'application/json' (in which case
         *     the body must be a valid JSON)
         * @returns {string | Object} HTTP response body; returns a string when request Content-Type is 'text/plain'; returns an
         *     Object when request Content-Type is 'application/json' or 'application/xml'
         * @since 2015.2
         */
        const post = (requestBody) => {

            //Validate requestBody
            if (!requestBody.body || !requestBody.body.location||!requestBody.body.internalid||!requestBody.body.data) {

                error.create({
                    name: 'Invalid_Post_Data',
                    message: 'Please check documenation for validate Post data',
                    notifyOff: false
                });
                return '';
            }
            var objInvCountBd = requestBody.body;

            // Create Inventory Count
            var recInvCount = record.create({
                type: record.Type.INVENTORY_COUNT,
                isDynamic: false
            });

            recInvCount.setValue('location', objInvCountBd.location);
            recInvCount.setValue('account', 1423);
            recInvCount.setValue('custbody_wms_invcount_id', objInvCountBd.internalid);
            recInvCount.setValue('custbody_wms_invcount_user', requestBody.user);


            var arrInvCountItems = [];
            arrInvCountItems = objInvCountBd.data;

            for(var ln=0 ; arrInvCountItems && ln<arrInvCountItems.length; ln++){

                var objInvCountItm = arrInvCountItems[ln];

                recInvCount.setSublistValue({
                    sublistId: 'item',
                    fieldId: 'item',
                    value: objInvCountItm.item,
                    line: ln
                });
                recInvCount.setSublistValue({
                    sublistId: 'item',
                    fieldId: 'binnumber',
                    value: objInvCountItm.binnumber, //20 = 2.配件库位; 23 = 1. 成品库位
                    line: ln
                });

                arrInvCountItems[ln].line = ln;
            }
            recInvCount.setValue('custbody_wms_invcount_items', JSON.stringify(arrInvCountItems));

            var intInvCountId = recInvCount.save({
                enableSourcing: true
                // , ignoreMandatoryFields: true
            });
            log.audit('ep_OperateInvCount_rl', 'Created New Inventory Count: ' + intInvCountId);

            // return {
            //     code: 0,
            //     msg: '推送库存盘点单成功'
            // };
            return intInvCountId;
        }

        /**
         * Defines the function that is executed when a DELETE request is sent to a RESTlet.
         * @param {Object} requestParams - Parameters from HTTP request URL; parameters are passed as an Object (for all supported
         *     content types)
         * @returns {string | Object} HTTP response body; returns a string when request Content-Type is 'text/plain'; returns an
         *     Object when request Content-Type is 'application/json' or 'application/xml'
         * @since 2015.2
         */
        const doDelete = (requestParams) => {

        }

        return {
            // get: post,
            // , put,
            post: post
            // , delete: doDelete
        }

    });
Sample Inventory Count User Event
根据严格限定条件, 锁定只有第一次RestLet传来的库存盘点单才进行自动化处理. “开始盘点Start Count”, 输入每个货品详细的盘点批次和数量等数据 和 “完成盘点Complete Count” 和 “审批Approve”这个四个动作action
/**
 * @NApiVersion 2.1
 * @NScriptType UserEventScript
 */
define(['N/action', 'N/error', 'N/record', 'N/runtime', 'N/search'],

    (action, error, record, runtime, search) => {
        /**
         * Defines the function definition that is executed before record is loaded.
         * @param {Object} scriptContext
         * @param {Record} scriptContext.newRecord - New record
         * @param {string} scriptContext.type - Trigger type; use values from the context.UserEventType enum
         * @param {Form} scriptContext.form - Current form
         * @param {ServletRequest} scriptContext.request - HTTP request information sent from the browser for a client action only.
         * @since 2015.2
         */
        const beforeLoad = (scriptContext) => {

        }

        /**
         * Defines the function definition that is executed before record is submitted.
         * @param {Object} scriptContext
         * @param {Record} scriptContext.newRecord - New record
         * @param {Record} scriptContext.oldRecord - Old record
         * @param {string} scriptContext.type - Trigger type; use values from the context.UserEventType enum
         * @since 2015.2
         */
        const beforeSubmit = (scriptContext) => {

        }

        /**
         * Defines the function definition that is executed after record is submitted.
         * @param {Object} scriptContext
         * @param {Record} scriptContext.newRecord - New record
         * @param {Record} scriptContext.oldRecord - Old record
         * @param {string} scriptContext.type - Trigger type; use values from the context.UserEventType enum
         * @since 2015.2
         */
        const afterSubmit = (scriptContext) => {

            var currentRecord = scriptContext.newRecord;
            var intInvCountId = currentRecord.id;

            //flag for restlet API transaction
            if (!currentRecord.getValue('custbody_wms_invcount_id'))
                return true;

            //only available for RESTLET
            if (runtime.executionContext != runtime.ContextType.RESTLET)
                return true;

            if (!currentRecord.getValue('status')||
                currentRecord.getValue('status') == 'Open' || currentRecord.getValue('statuskey') == 'A') {

                action.execute({
                    id: 'startcount',
                    recordType: currentRecord.type,
                    params: {
                        recordId: currentRecord.id
                    }
                });

                //re-enter the quantity and count detail
                recInvCount = record.load({
                    type: record.Type.INVENTORY_COUNT,
                    id: intInvCountId
                })


                var strItemData = recInvCount.getValue('custbody_wms_invcount_items');
                var arrInvCountItems = JSON.parse(strItemData);
                var arrLinkedArrIdx = [];

                for(var i=0 ; arrInvCountItems && i<arrInvCountItems.length; i++){

                    var objInvCountItm = arrInvCountItems[i];

                    var intItemId_tmp = recInvCount.getSublistValue({
                        sublistId: 'item',
                        fieldId: 'item',
                        line: i
                    });
                    var intItemBin_tmp = recInvCount.getSublistValue({
                        sublistId: 'item',
                        fieldId: 'binnumber',
                        line: i
                    });

                    if (objInvCountItm.item!=intItemId_tmp || objInvCountItm.binnumber!=intItemBin_tmp)
                        continue;


                    // countdetail  --------------------------
                    var intQtyTtl = 0;
                    var arrCountDtl = objInvCountItm.info;

                    var objCountDtl = recInvCount.getSublistSubrecord({
                        sublistId: 'item',
                        fieldId: 'countdetail',
                        line: i
                    });

                    for(var countDtlIdx=0 ; arrCountDtl && countDtlIdx<arrCountDtl.length; countDtlIdx++){

                        objCountDtl.setSublistValue({
                            sublistId: 'inventorydetail',
                            fieldId: 'inventorynumber',
                            value: arrCountDtl[countDtlIdx].inventorynumber,//'Test20250812',
                            line: countDtlIdx
                        });
                        objCountDtl.setSublistValue({
                            sublistId: 'inventorydetail',
                            fieldId: 'inventorystatus',
                            value: arrCountDtl[countDtlIdx].inventorystatus,//'1',
                            line: countDtlIdx
                        });
                        objCountDtl.setSublistValue({
                            sublistId: 'inventorydetail',
                            fieldId: 'quantity',
                            value: arrCountDtl[countDtlIdx].inventorycount,//'999',
                            line: countDtlIdx
                        });

                        intQtyTtl = intQtyTtl + arrCountDtl[countDtlIdx].inventorycount;
                    }

                    recInvCount.setSublistValue({
                        sublistId: 'item',
                        fieldId: 'countquantity',
                        value: intQtyTtl,
                        line: i
                    });

                }

                var intInvCountId = recInvCount.save();
                log.audit('wms_invCount_ue', 'Updated New Inventory Count: ' + intInvCountId);

                action.execute({
                    id: 'completecount',
                    recordType: currentRecord.type,
                    params: {
                        recordId: currentRecord.id
                    }
                });

                action.execute({
                    id: 'approve',
                    recordType: currentRecord.type,
                    params: {
                        recordId: currentRecord.id
                    }
                });

            }

            return true;
        }

        return {
            // beforeLoad, beforeSubmit,
            afterSubmit
        }

    });
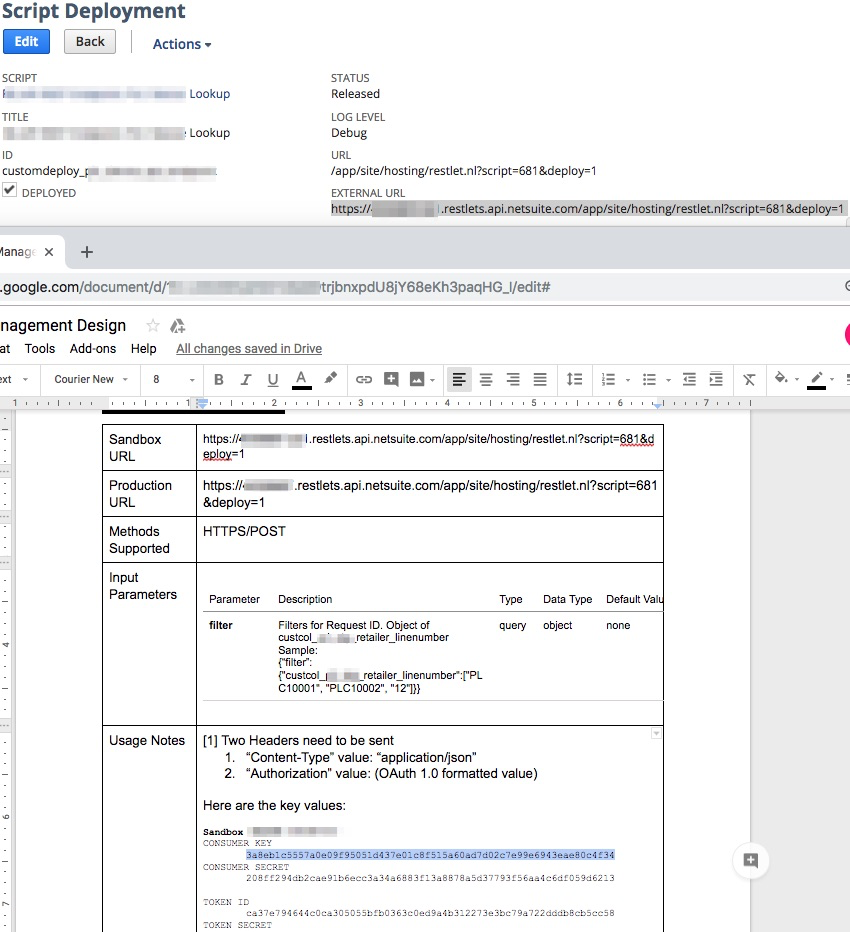
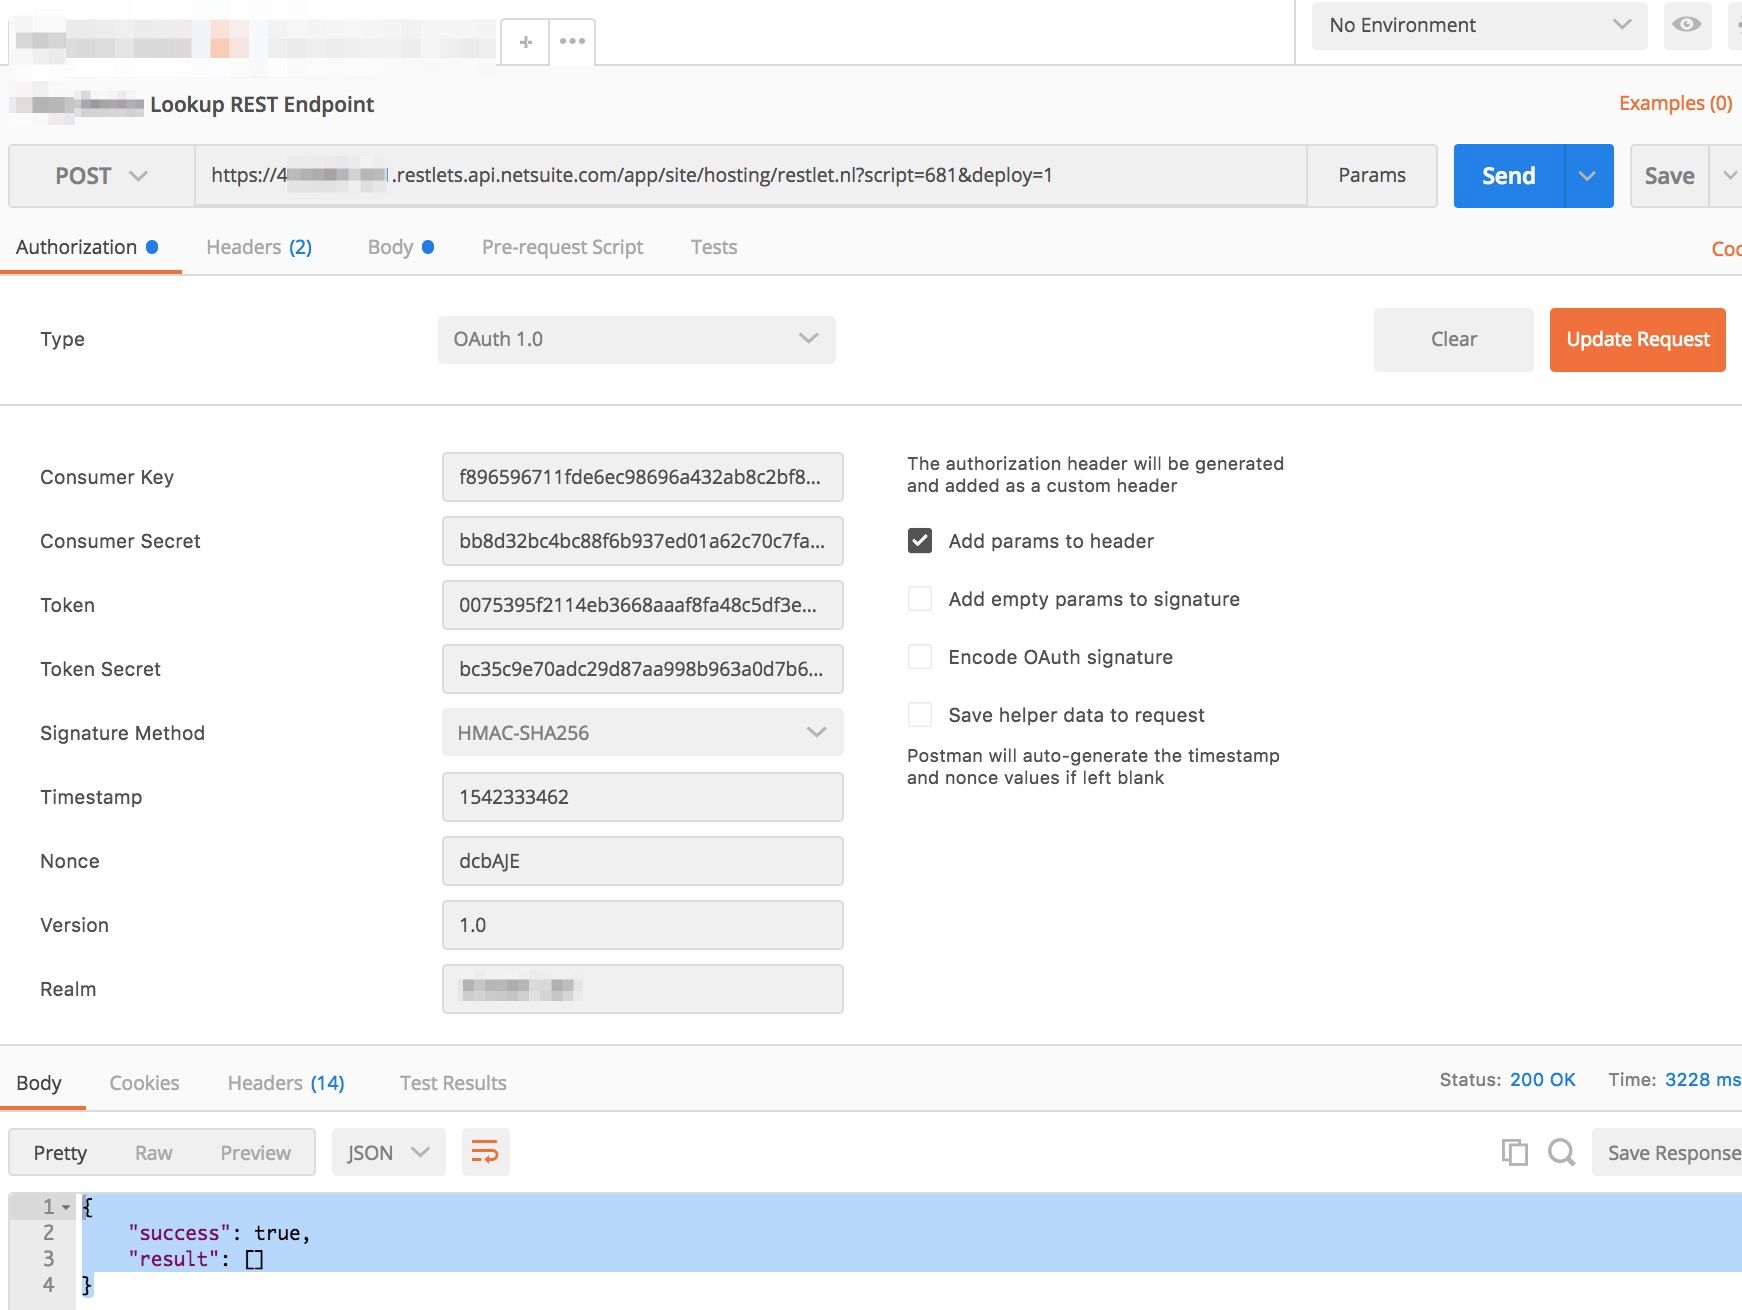
POSTMAN及设置
oAuth 1.0 的设置中, 有个需要注意的地方: 把NetSuite Account ID 放到 header的 Realm 字段中. In Postman in your request tab and then in the authorization tab in the advanced section there is a field called Realm. Put the account id in the realm field with underscores.

结语
实例由于隐去所有显示应用的信息, 难免会十分偏向于技术性的探讨, 也变得比较难理解.
如果您对这类对接设计或开发或应用实现等感兴趣, 可通过下方的链接(或扫码) 与我取得联系
我们可以进行更加针对性的探讨与交流
感谢您有耐心看到这里, 祝您生活愉快!~
本文仅是思路的探讨, 如有侵权, 请联系作者删除修改